
Using AWS CDK with Serverless Framework
In this guide we’ve looked at two different ways of creating serverless applications; using SST and using Serverless Framework. But you can use the two of them together as well.
As in, you can create your infrastructure with SST and manage your Lambda functions and APIs with Serverless Framework. There are a couple of reasons why you might find yourself wanting to do this.
- Your applications are currently built using Serverless Framework and you want to use AWS CDK instead of CloudFormation for your resources.
- Or, you are looking to migrate from Serverless Framework to SST.
In this chapter we’ll look at how we can use SST to define your infrastructure using CDK and connecting that to our Serverless Framework app.
Background
To understand how we can use Serverless Framework and CDK together, let’s look at how their apps are structured.
Serverless Framework App Architecture
Serverless Framework apps can be made up of multiple services and the app as a whole is deployed to the same environment.
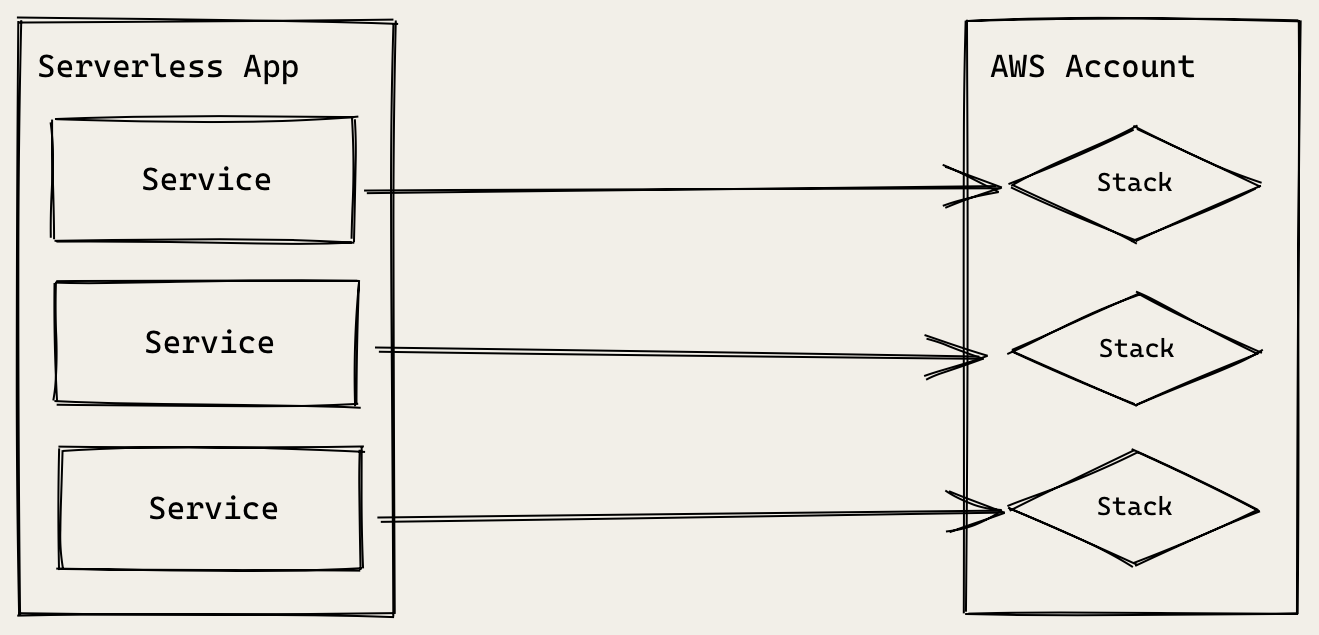
You might recall that Serverless Framework internally uses CloudFormation. So each service is deployed as a CloudFormation stack to the target AWS account. You can specify a stage, region, and AWS profile to customize this.
$ AWS_PROFILE=development serverless deploy --stage dev --region us-east-1
The --stage option here prefixes your stack names with the stage name. So if you are deploying multiple stages to the same AWS account, the resource names will not thrash.
This allows you to easily deploy your serverless app to multiple environments. Even if they are in the same AWS account.
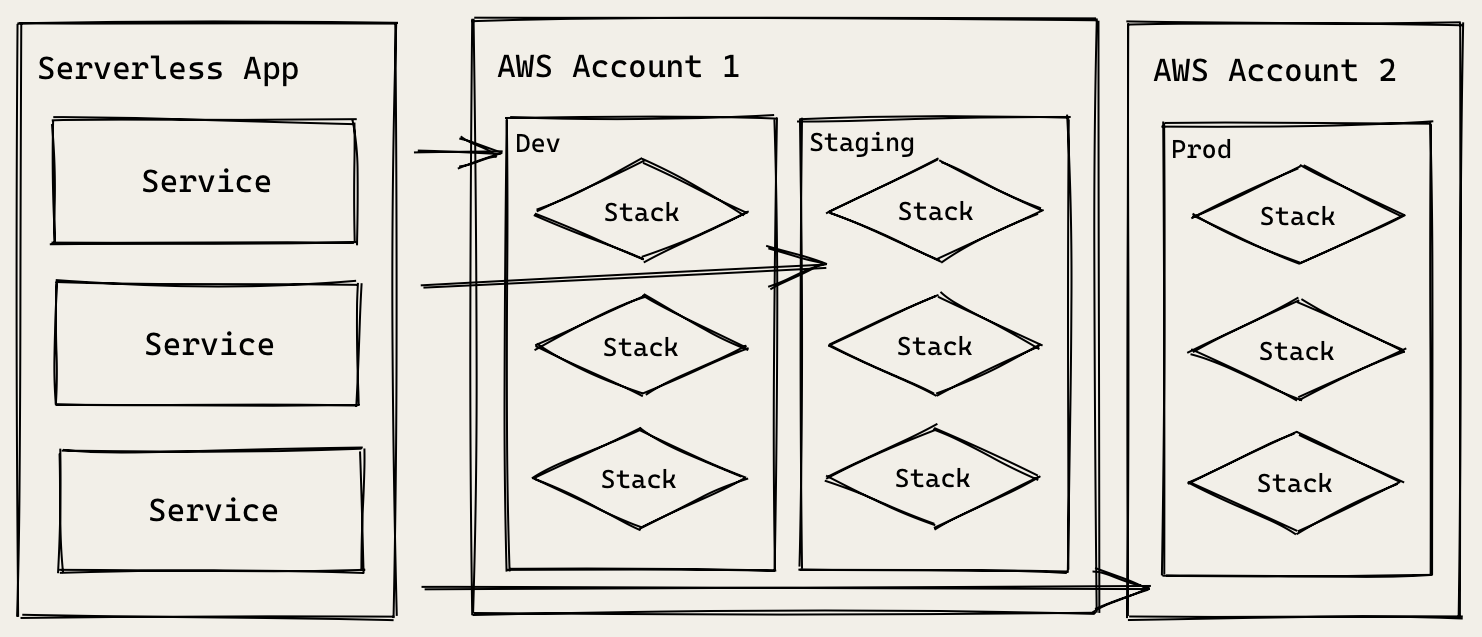
In the example above, the same app is deployed three times to three different stages. And two of the stages are in the same AWS account. While the third is in its own account.
We are able to do this by simply changing the options in the serverless deploy command. This allows us to deploy to multiple environments/stages without making any changes to our code.
CDK App Architecture
AWS CDK apps on the other hand are made up of multiple stacks. And each stack is deployed to the target AWS account as a CloudFormation stack. However, unlike serverless apps, each stack can be deployed to a different AWS account or region.
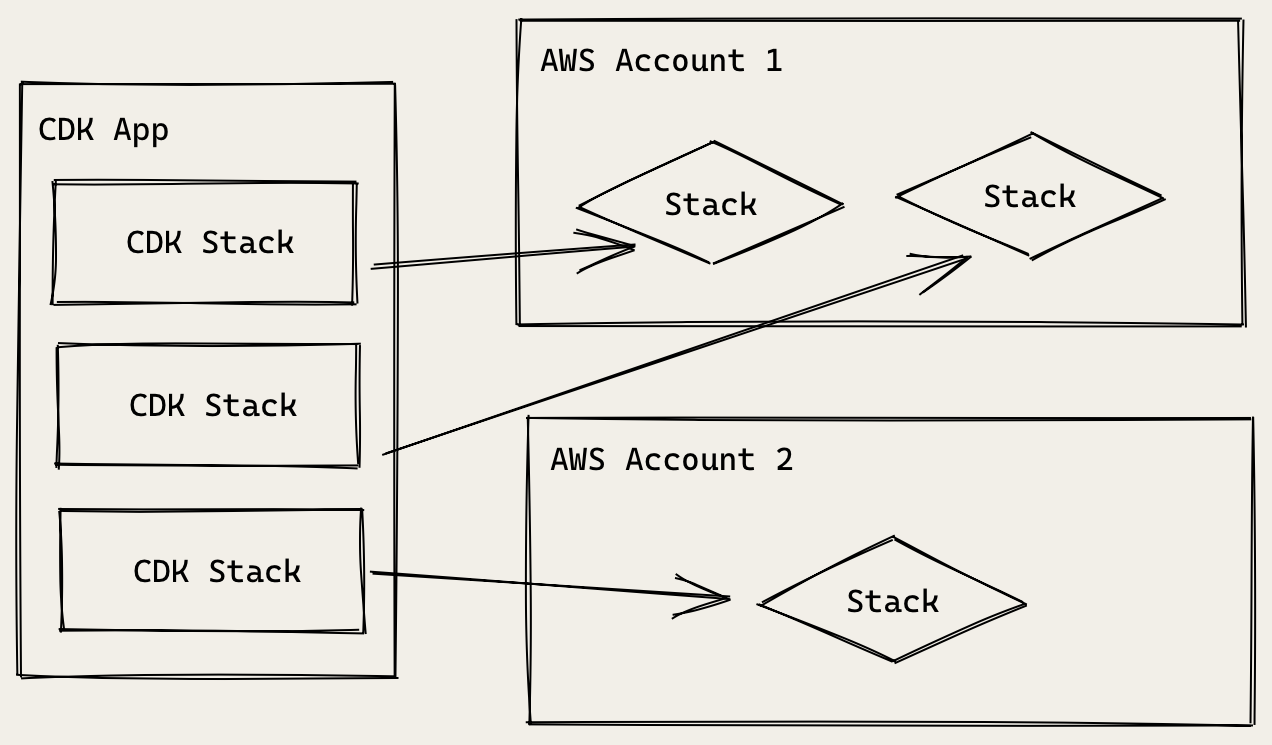
You can define the AWS account and region that you want your CDK stack to be deployed to.
new MyStack(app, "my-stack", { env: { account: "1234", region: "us-east-1" } });
This means that each time you deploy your CDK app, it could potentially create a stack in multiple environments. This critical design difference prevents us from directly using CDK apps alongside our serverless services.
You can fix this issue by following a certain convention in your CDK app. However, this is only effective if these conventions are enforced.
Ideally, we’d like our CDK app to work the same way as our Serverless Framework app. So we can deploy them together. This will matter a lot more when we are going to git push to deploy our apps automatically.
Serverless Stack Framework (SST) fixes this issue.
Enter, Serverless Stack Toolkit
SST allows you to follow the same conventions as Serverless Framework. This means that you can deploy your Lambda functions using.
$ AWS_PROFILE=production serverless deploy --stage prod --region us-east-1
And use CDK for the rest of your AWS infrastructure.
$ AWS_PROFILE=production npx sst deploy --stage prod --region us-east-1
Just like Serverless Framework, the stacks in your CDK app are prefixed with the stage name. Now you can use Serverless Framework and CDK together! Allowing you to do something like this.
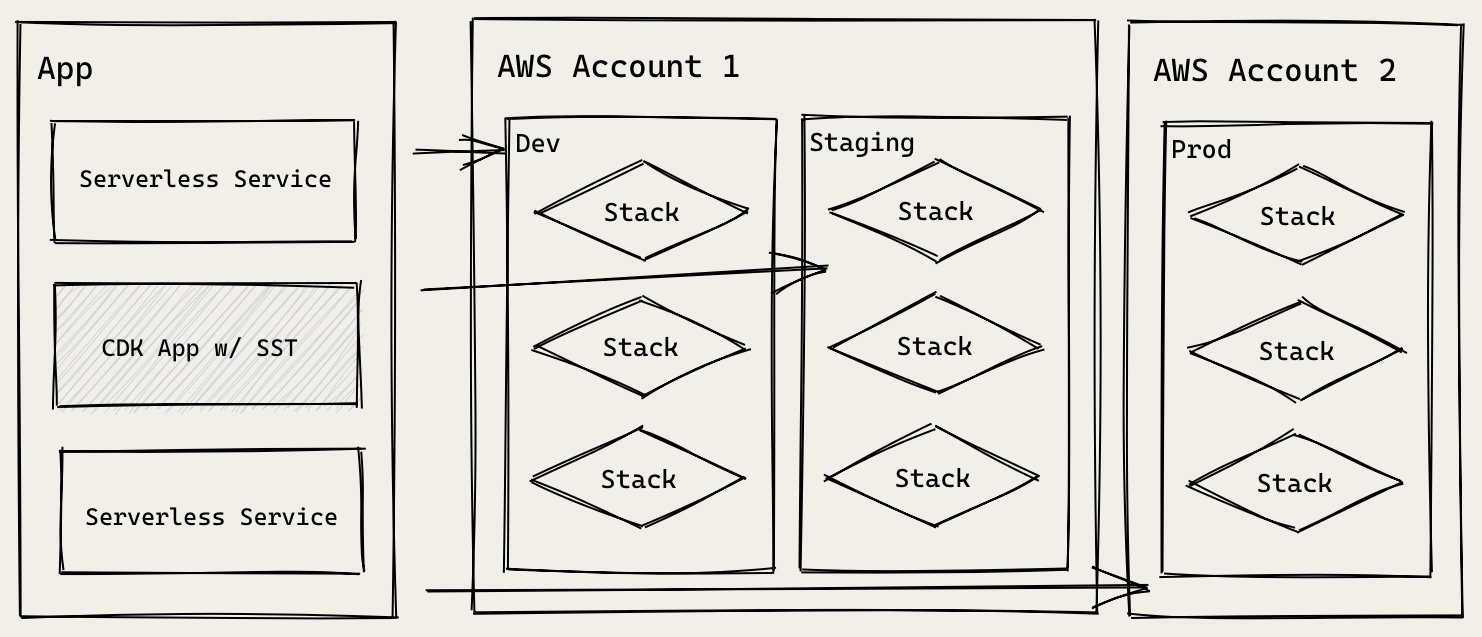
Here, just like the Serverless Framework example above; our app is made up of three services. Except, one of those services is a CDK app deployed using SST!
We’ll be deploying it using the sst deploy command, instead of the standard cdk deploy command.
Now that you know how these frameworks work behind the scenes, let’s look at how we can connect a notes app built with Serverless Framework to an SST app that defines our infrastructure.
Reference Your SST App
Start by adding a reference to your SST app in your serverless.yml.
 Add the following
 custom: block at the top of our services/notes/serverless.yml above the provider: block.
custom:
  # Our stage is based on what is passed in when running serverless
  # commands. Or falls back to what we have set in the provider section.
  stage: ${opt:stage, self:provider.stage}
  # Name of the SST app that's deploying our infrastructure
  sstApp: ${self:custom.stage}-notes-infra
Here notes-infra is the name of our SST app as defined in infrastructure/sst.json.
{
  "name": "notes-infra",
  "stage": "dev",
  "region": "us-east-1"
}
Let’s look at what we are defining in your serverless.yml in a little more detail.
-
We first create a custom variable called
stage. You might be wondering why we need a custom variable for this when we already havestage: devin theprovider:block. This is because we want to set the current stage of our project based on what is set through theserverless deploy --stage $STAGEcommand. And if a stage is not set when we deploy, we want to fallback to the one we have set in the provider block. So${opt:stage, self:provider.stage}, is telling Serverless Framework to first look for theopt:stage(the one passed in through the command line), and then fallback toself:provider.stage(the one in the provider block). -
Next, we set the name of our SST app as a custom variable. This includes the name of the stage as well —
${self:custom.stage}-notes-infra. It’s configured such that it references the SST app for the stage the current serverless app is deployed to. So if you deploy your API app todev, it’ll reference the dev version of the SST notes app.
These two simple steps allow us to (loosely) link our Serverless Framework and CDK app using SST.
Just for reference, the top of our serverless.yml should look something like this.
service: notes-api

# Create an optimized package for our functions
package:
  individually: true

plugins:
  - serverless-bundle # Package our functions with Webpack
  - serverless-offline
  - serverless-dotenv-plugin # Load .env as environment variables

custom:
  # Our stage is based on what is passed in when running serverless
  # commands. Or falls back to what we have set in the provider section.
  stage: ${opt:stage, self:provider.stage}
  # Name of the SST app that's deploying our infrastructure
  sstApp: ${self:custom.stage}-notes-infra

provider:
  name: aws
  runtime: nodejs12.x
  stage: dev
  region: us-east-1

...
Reference DynamoDB
Next let’s programmatically reference a DynamoDB table created using SST.
Replace the environment and iamRoleStatements block with in your serverless.yml with.
  # These environment variables are made available to our functions
  # under process.env.
  environment:
    stripeSecretKey: ${env:STRIPE_SECRET_KEY}
    tableName: !ImportValue '${self:custom.sstApp}-TableName'

  iamRoleStatements:
    - Effect: Allow
      Action:
        - dynamodb:Scan
        - dynamodb:Query
        - dynamodb:GetItem
        - dynamodb:PutItem
        - dynamodb:UpdateItem
        - dynamodb:DeleteItem
        - dynamodb:DescribeTable
      # Restrict our IAM role permissions to
      # the specific table for the stage
      Resource:
        - !ImportValue '${self:custom.sstApp}-TableArn'
Make sure to copy the indentation correctly. Your provider block should look something like this.
provider:
  name: aws
  runtime: nodejs12.x
  stage: dev
  region: us-east-1

  # These environment variables are made available to our functions
  # under process.env.
  environment:
    stripeSecretKey: ${env:STRIPE_SECRET_KEY}
    tableName: !ImportValue '${self:custom.sstApp}-TableName'

  iamRoleStatements:
    - Effect: Allow
      Action:
        - dynamodb:Scan
        - dynamodb:Query
        - dynamodb:GetItem
        - dynamodb:PutItem
        - dynamodb:UpdateItem
        - dynamodb:DeleteItem
        - dynamodb:DescribeTable
      # Restrict our IAM role permissions to
      # the specific table for the stage
      Resource:
        - !ImportValue '${self:custom.sstApp}-TableArn'
Let’s look at what we are doing here.
-
We’ll use the name of the SST app to import the CloudFormation exports that was setup in CDK.
-
We’ll then change the
tableNamefrom the hardcodednotesto!ImportValue '${self:custom.sstApp}-TableName'. This imports the table name that we exported in CDK. -
Similarly, we’ll import the table ARN using
!ImportValue '${self:custom.sstApp}-TableArn'. Previously, we were giving our Lambda functions access to all DynamoDB tables in our region. Now we are able to lockdown our permissions a bit more specifically.
You might have picked up that we are using the stage name extensively in our setup. This is because we want to ensure that we can deploy our app to multiple environments simultaneously. This setup allows us to create and destroy new environments simply by changing the stage name.
Add to the Cognito Authenticated Role
While we are on the topic of giving our Lambda functions IAM access. We’ll need to do something similar for our API.
Note that, we don’t need to explicitly give them access to our Lambda functions or DynamoDB table. This is because we are securing access at the level of the API endpoint. We assume that if you can access our endpoint, you have access to our Lambda functions. And the DynamoDB permissions that we setup above are not for our users, but our Lambda functions. We don’t do this for our S3 bucket because the user is directly uploading files to S3. So we need to secure access to it as well. Put another way, the two external touch points our user has is our API endpoint and S3 bucket. And that’s what we need to secure access to.
So let’s add our API endpoint to an authenticated role created in our SST app.
Add a new resource in your serverless.yml with.
Resources:
  CognitoAuthorizedApiPolicy:
    Type: AWS::IAM::Policy
    Properties:
      PolicyName: ${self:custom.stage}-CognitoNotesAuthorizedApiPolicy
      PolicyDocument:
        Version: "2012-10-17"
        Statement:
          - Effect: "Allow"
            Action:
              - "execute-api:Invoke"
            Resource:
              !Sub 'arn:aws:execute-api:${AWS::Region}:${AWS::AccountId}:${ApiGatewayRestApi}/*'
      Roles:
        - !ImportValue '${self:custom.sstApp}-CognitoAuthRole'
While YAML can be a bit hard to read, here is what we are doing.
-
We create a new policy called
${self:custom.stage}-CognitoNotesAuthorizedApiPolicy. We make sure it’s unique when we deploy it to multiple environments. -
This policy has
execute-api:Invokeaccess to thearn:aws:execute-api:${AWS::Region}:${AWS::AccountId}:${ApiGatewayRestApi}/*resource. Once we attach this resource to our API, theApiGatewayRestApivariable will be replaced with the API we are creating. -
Finally, we attach this policy to the role we previously created (and exported),
!ImportValue '${self:custom.sstApp}-CognitoAuthRole'. This role needs to be exported in our SST app.
And now we are able to link the infrastructure created in our SST app with our Serverless Framework app.
For help and discussion
Comments on this chapter